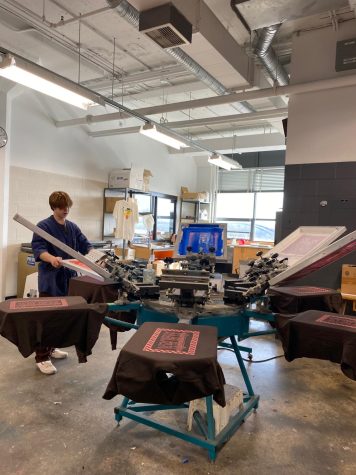
Screen Printing
March 9, 2023
Are you interested in making clothing, but don’t know where to start, well look no further. Here is how you can learn to screen print step by step. There’s a lot of ways to make clothing. A few clothing printing methods are screen printing, DTG printing (direct to garment), heat pressing printing, sublimation printing, plastisol printing, heat transfer vinyl, etc.
1. Design Mock-ups
People neglect having mock-ups, especially when just starting to make clothing. Throwing any of your ideas on to a blank, any idea can be a great design that’s why it’s important to sketch up designs. Once you’ve made a design your satisfied with, print the design onto a transparent acetate film.
2. Supplies
You’ll need a printer, scoop coater the same size as the screen, ink, squeegees, emulsion, washing machine with high pressure water, speedball UV exposure lamp, tape, transparent film sheets. Getting an aluminum frame is better than a wooden frame, aluminum frames are more durable and can be reused for different designs. Emulsion is a light sensitive glue, which creates a stencil on the screen. Mesh sizes are measured by how many threads of mesh are across per square inch. Standard mesh counts for screen printing ranges between 110 and 156. 110 mesh lays a fairly thick layer of ink down. 156 mesh count also lays down a thick layer of ink but in higher detail. Thinner ink like water-based ink should be printed through a high mesh count. Thicker inks like white plastisol ink should be printed through a low mesh count.
3. Creating the Screen
Screen printing is forcing ink through a silk mesh screen, and you’ll want a mesh screen that matches the complexity of your design. Then place the emulsion onto the scooper, make sure it’s the same size as your screen. Tilt the screen till it’s at a 45-degree angle then slowly up on the screen with the emulsion scooper. Afterwards place the transparent sheet onto the screen and place a UV light over the screen, let it sit for about 1 hour so it can burn the design into the screen. After burning it for 60 minutes, rinse off the emulsion with cold water, and let the screen dry. Use masking tape to go around the inside of the screen to prevent ink from running into edges of the screen and spot check for any emulsion that was missed. Now your screen is ready to print.
4. Printing
Place your selected ink and place it at the top end of the screen and have your desired garment underneath ready to be printed on. Grab your squeegee and pull the ink down to the bottom of the screen the push the ink back up to the top. Afterwards heat the shirt up through a dryer which will cure the ink and smooth it out. Congratulations you screen printed your first shirt.


